Easy Slick Back Bun Tutorial: 9 Simple Steps for a Smooth, Elegant Style
Want a hairstyle that looks good anywhere—whether you’re dressed up or keeping it casual? A slick back bun is always a safe bet. It’s classy, clean, and honestly way easier than it looks.
I love this style because it keeps everything neat but still stylish. You don’t need any special skills or fancy tricks. With just a few basic steps, you can pull off a sleek, polished bun right at home.
So if you’re ready to master this go-to look, let’s walk through the essentials and the steps you need. Here’s everything you should have on hand before you start.
Gather Your Tools

Before you jump into styling, it helps to get your tools ready. Think of it like prepping your kitchen before cooking—it makes everything smoother and faster.
Essential Hair Products

These are the products that make your slick back bun look sharp and stay in place:
- Strong-hold gel or pomade: This is your main hero. It smooths your hair and keeps it from moving.
- Good hairspray: A quick mist at the end helps your bun stay sleek all day.
- Fine-tooth comb: Perfect for distributing product and removing bumps.
These little things make a big difference. Without them, your bun might look messy or fall apart halfway through the day.
Must-Have Accessories

Accessories are the supporting cast that keeps everything secure:
- Hair ties that match your hair color
- Bobby pins for stray hairs
- Boar bristle brush for shine and smoothness
- A silk scarf to wrap your hair after styling—just a few minutes helps set everything in place
Trust me, the silk scarf trick is a game-changer. It’s like pressing a shirt to get rid of wrinkles but for your hair.
Prep Your Hair
Good prep makes a huge difference. When your hair is clean, smooth, and tangle-free, your bun looks sleeker and stays put.
Clean and Condition
Start with freshly washed hair.
Use a gentle shampoo to remove oil and dirt. Follow it with a moisturizing conditioner so your hair feels soft and easy to work with. Make sure to rinse well—leftover product can weigh your hair down and ruin the smooth finish.
Detangle and Dry
Lightly pat your hair dry with a towel. Try not to rub it—rubbing creates frizz, and frizz is definitely not invited to this party.
Use a wide-tooth comb to detangle. Then blow-dry on low heat so your hair stays shiny and healthy. Once your hair is mostly dry, run a fine-tooth comb through it to smooth everything out.
Now your hair is ready for the fun part.
Create a Part
Your part shapes the whole look, so choose the one that feels right for you.
Choose Your Parting Style

You’ve got options:
- Middle part: Clean, classic, and super balanced
- Side part: Adds a bit of drama or softness
- Zigzag part: Fun, playful, and eye-catching
Think about your mood, your outfit, and what feels like “you” today.
Use a Fine-Tooth Comb

Grab your comb and start at your hairline. Glide it straight back to create a clean line. Smooth down each side so the hair lays flat.
Take a moment here—once your part looks neat, the rest of the style becomes much easier.
Apply Styling Product
This step is where the magic happens. The right product helps you get that shiny, sleek look and keeps your hair from moving around.
Pick a gel, cream, or pomade that works for your hair type. Put a small amount on your hands, rub them together, and smooth it through your hair. Make sure to apply it evenly from the roots to the ends near your part and crown.
Select the Right Product

Choosing the right product is half the battle when it comes to a smooth, clean slick back bun. Think of it like picking the right spice for a recipe—use the wrong one, and the whole thing feels off.
You’ve got a few great options:
- Hair gel: Strong hold with that classic wet, glossy finish.
- Hair cream: Softer hold and a natural look—perfect if you want something subtle.
- Hair wax: Firm, flexible hold with a matte effect.
- Hair mousse: Light, airy volume that doesn’t weigh your hair down.
If your hair is fine, go for lighter textures like mousse or cream so it doesn’t get flat. If your hair is thick, curly, or a bit unruly, gel or wax will be your best friend because they keep everything in place without fighting back.
Work Through Hair Evenly
Once you’ve picked your product, the next step is spreading it evenly—this is what makes your slick back bun look smooth instead of patchy.
Here’s the simplest way to do it:
- Start with clean, damp hair. Your hair grabs product better this way.
- Use a small amount first. You can always add more, but it’s hard to go back once you’ve used too much.
- Warm it in your hands. Rub your palms together to spread it evenly.
- Apply from roots to ends. Think of it like giving your hair a quick massage.
- Run a fine-tooth comb through it. This blends everything and removes bumps.
The goal is to coat every strand just enough for control but not so much that your hair feels stiff.
Slick Back Your Hair

Creating that sleek, pulled-back look feels so satisfying—almost like ironing a wrinkled shirt. Everything looks clean, smooth, and polished.
Brush Back Smoothly
Start with dry hair. Grab your paddle brush and brush your hair straight back. Take your time here, especially if your hair tangles easily.
If you want an extra smooth finish, dab a bit of serum onto your palms and glide them over your hair. It helps tame flyaways and gives a soft shine. Then go back with your brush for that final sleek sweep.
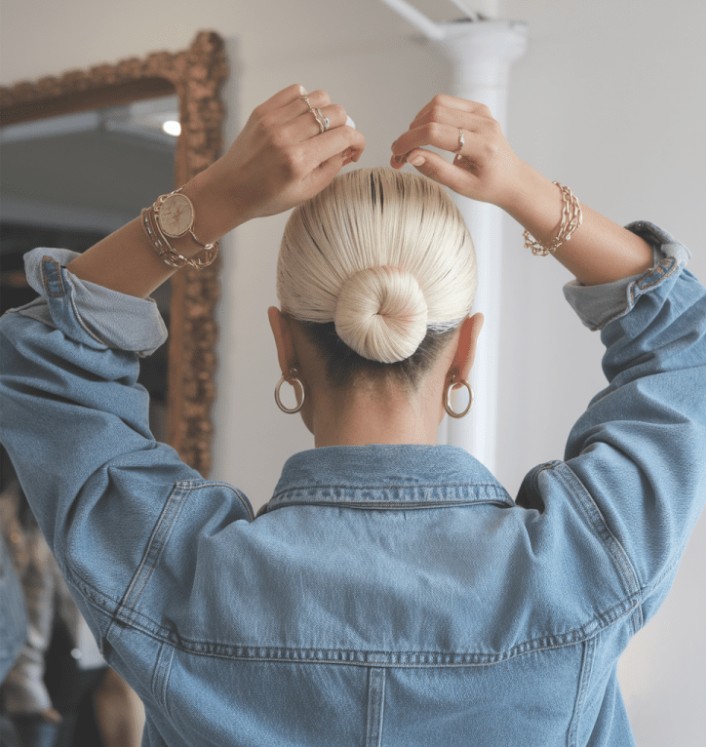
Secure in Place

Now bring your hair to the nape of your neck. Make sure it’s smooth before tying it—once the elastic is in, it’s harder to fix bumps.
Tie your hair into a tight ponytail. Twist the ponytail, then wrap it around itself to form a bun. Secure it with bobby pins, hiding them inside the bun for a clean look.
Finish with a light hairspray mist. A little goes a long way, so you don’t want to drench your hair.
Form the Bun
This is where your bun takes shape. Doing it right keeps it tight all day.
Twist and Coil
Hold your ponytail at the base and twist it from top to tip. Twisting helps keep the hair neat and makes forming the bun easier.
Then coil the twist around the base of your ponytail. Keep the coil snug so no loose pieces peek out.
Use Hair Ties and Pins
Secure the bun with a small elastic or a few bobby pins. Slide the pins in close to your scalp so they hold better and stay out of sight.
Here’s a quick table to recap:
| Step | What to Do |
|---|---|
| 1 | Gather hair into a smooth ponytail |
| 2 | Twist the ponytail tightly |
| 3 | Coil it around the base |
| 4 | Secure with pins or an elastic |
A good bun should feel secure but not painful. Think “firm hug,” not “headache in ten minutes.”
Finish With Hairspray
Your hairspray is like the final seal on a letter—it keeps everything in place and gives your style that finished touch.
Apply for Hold
Hold the can about a foot away from your head and spray lightly. Focus on the bun and the hair leading into it.
Avoid over-spraying. Too much hairspray makes the hair look hard instead of sleek.
Tame Flyaways
Spray a little hairspray onto your fingertips and smooth down any tiny hairs that pop up. For more stubborn ones, coat a fine-tooth comb with a bit of hairspray and gently glide it through.
This trick keeps everything sharp and polished.
Accessorize
A slick back bun already looks chic, but the right accessory can elevate it from simple to stunning.
Add Elegant Touches
Try adding:
- Delicate pins
- Sparkly clips
- Pearl accents
- A slim decorative comb
- A silk scarf around the bun
Each adds personality and can match your mood or the event.
Match With Your Outfit
For a balanced look, match your accessories to your outfit:
| Accessory | Best For |
|---|---|
| Delicate hairpins | Formal events |
| Sparkling clips | Parties |
| Decorative comb | Weddings |
| Silk scarf | Casual outings |
| Pearl pins | Dinners or classic looks |
Small details can tie your whole style together.
Frequently Asked Questions
How do I make a slick back bun?
Brush your hair back, apply gel or cream, gather it into a ponytail, twist, coil, and pin.
Which hair types does this style suit?
All hair types. Use lightweight products for fine hair and strong-hold products for thicker textures.
How long does it last?
All day with good products and secure pins.
What products do I need?
A brush, gel or cream, elastic ties, bobby pins, and optional hairspray or serum.
Conclusion
A slick back bun is simple, stylish, and works for literally any occasion. Once you practice the steps, you can do it in minutes. The secret is choosing the right product, smoothing your base, and keeping your bun secure.
Play around with accessories and parting styles to make it your own.
Enjoy the confidence that comes with a clean, polished look—because nothing beats a hairstyle that makes you feel put-together and effortless.